Arduino home automation has emerged as the most accessible, cost-effective pathway for DIYers to build custom smart home systems. Unlike proprietary platforms that demand expensive hubs, proprietary sensors, and monthly subscriptions, Arduino lets builders create automation tailored to their exact needs, controlling lights, doors, temperature, and appliances, for a fraction of mainstream alternatives. The barrier to entry has never been lower. This guide walks readers through the fundamentals of Arduino home automation, from core components through real-world project builds, making it clear that a functional smart home isn’t reserved for tech experts or deep-pocket renovators.
Key Takeaways
- Arduino home automation offers a cost-effective alternative to commercial smart home systems, with microcontroller boards starting at just $15–$80 and zero recurring subscription fees.
- Essential components for Arduino home automation include a microcontroller board (Uno or Mega), relay modules, sensors, and a quality power supply, with a complete beginner setup costing under $200.
- Start with simple projects like motion-sensor-activated lights or smart thermostats to master the fundamentals before scaling to complex systems like automated garage door openers.
- Implement debouncing in your code, process logic locally rather than relying on the cloud, and add serial logging to prevent false triggers and diagnose hardware issues.
- Arduino home automation gives you full control over your system with no vendor lock-in, allowing you to swap obsolete components, modify code, and own your smart home completely.
Why Arduino Is the Perfect Choice for DIY Home Automation
Arduino boards are open-source microcontrollers that cost between $15 and $80, depending on the model. The Arduino Uno and Arduino Mega are the workhorses of home automation because they’re powerful enough to handle multiple sensor inputs and relay outputs without very costly. More importantly, they’re beginner-friendly: abundant documentation, active community forums, and pre-built libraries mean someone can move from “what’s a microcontroller?” to a functioning automation system in a weekend.
Comparable platforms, think commercial IoT hubs or specialized home automation controllers, charge $100–$500 upfront, then layer on subscription fees for cloud connectivity, integrations, and app access. Arduino strips that away. A builder controls everything locally, writes their own code, and owns the entire system. There’s no vendor lock-in. If a sensor becomes obsolete, swap it out. If requirements change, modify the code. That flexibility, combined with zero recurring costs, makes Arduino the thinking DIYer’s choice.
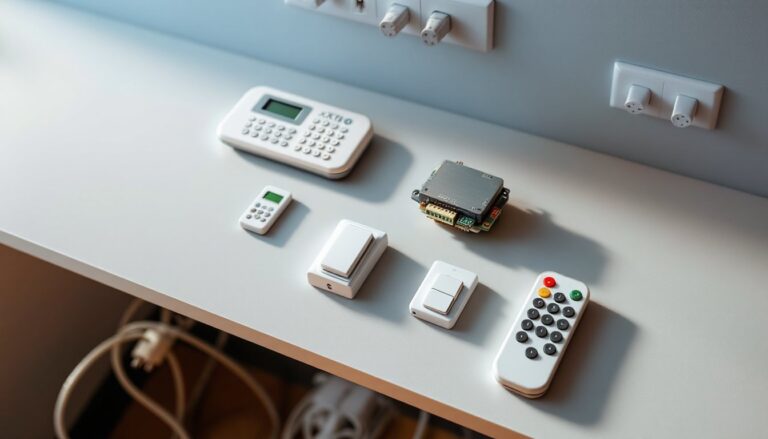
Essential Arduino Components and Hardware You’ll Need
Before writing a single line of code, gather the core components. Every Arduino automation setup requires:
Microcontroller board: Arduino Uno (good starter choice, ~$22–$30) or Arduino Mega (more I/O pins, ~$35–$50). The Mega is worth the extra investment if the project involves more than 10 connected devices.
Relay modules: These are critical. Relays are electrically isolated switches that let low-voltage Arduino circuits control high-voltage loads like lights, fans, or garage door openers. A 4-channel or 8-channel relay module (5V logic) costs $5–$12 per unit.
Sensors: Project-dependent, but common types include temperature sensors (DHT22, ~$8), motion sensors (PIR, ~$5–$10), and door/window sensors (magnetic switches, ~$2–$4).
Power supply: A dedicated 5V power supply rated for the board and all connected components prevents voltage sag and instability. A quality 2A or 4A supply runs $10–$20.
Breadboard and jumper wires: For prototyping before soldering anything permanent. Cost: $5–$10.
Optional but recommended: USB-to-serial converter (if not using a USB-capable board), solid-core 22-gauge hookup wire, and a basic multimeter for troubleshooting.
Safety note: If integrating with mains voltage (110/240V), use a licensed electrician or certified relay/contactor module. Arduino itself operates on low voltage and is safe, but mistakes with line voltage can cause fire or injury.
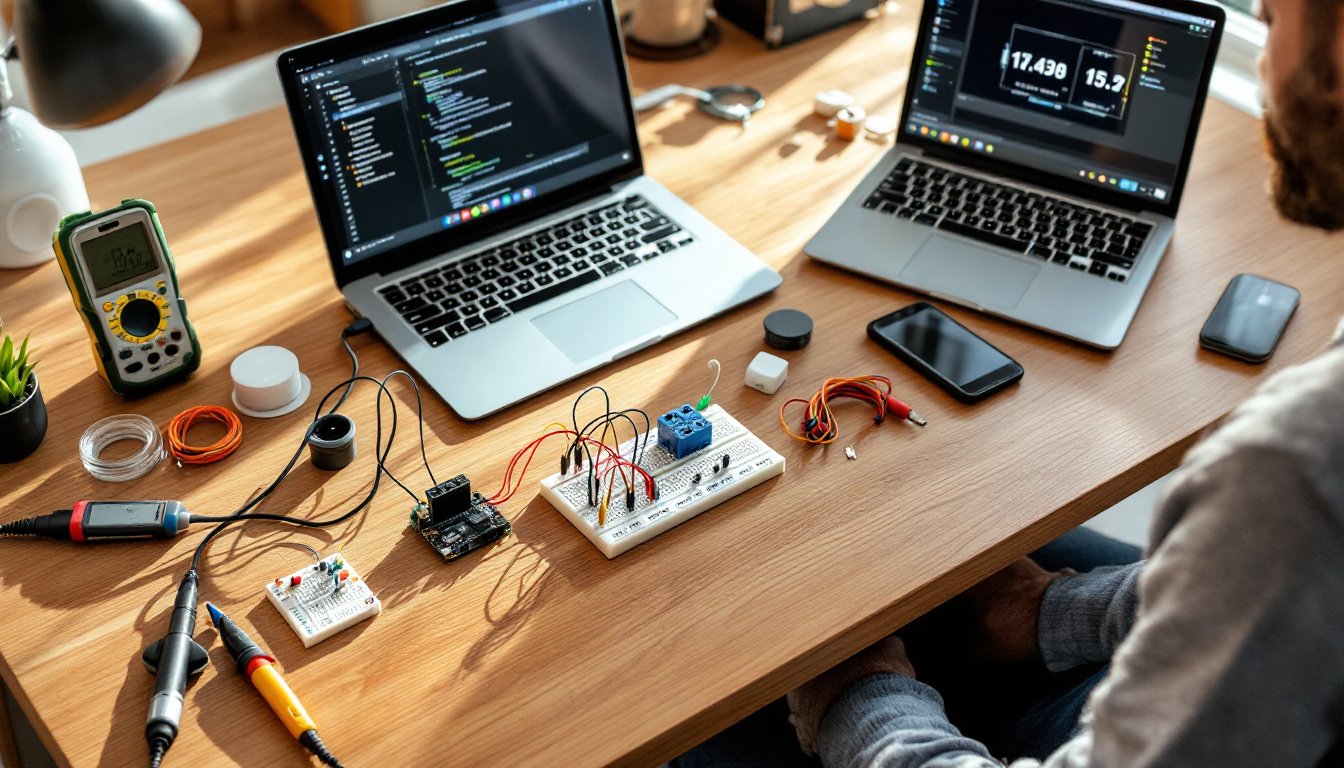
Getting Started: Setting Up Your First Arduino Automation Project
Setup happens in three phases: hardware assembly, software installation, and your first sketch.
Phase 1: Hardware Assembly
Start with a simple test: LED control via relay. Connect the Arduino 5V pin to the relay module VCC, ground to GND, and a digital I/O pin (e.g., pin 2) to the relay signal pin. This setup requires zero soldering, breadboards and jumper wires handle everything. Write a test sketch that switches the relay on and off every second. If the relay clicks and an LED lights up, the foundation is solid.
Phase 2: Software
Download the Arduino IDE (free, cross-platform). Connect the Arduino via USB. Install the board drivers and select the correct board/port under Tools. The Arduino IDE handles compilation and uploading, no additional software needed.
Phase 3: Your First Sketch
Start with something tangible. A motion-sensor-activated light is perfect: read a PIR sensor input, toggle a relay when motion is detected, and add a 30-second timeout before returning to standby. Here’s the template: define pins, set them as input or output in setup(), then read sensor state in loop() and trigger relay logic. Arduino’s documentation and the Arduino Reference are essential bookmarks.
Expect iteration. First sketches rarely work perfectly, sensor wiring, timing logic, or pin conflicts often need adjustment. That’s normal and part of the learning curve.
Popular Arduino Home Automation Projects to Build
Smart Lighting System
Control multiple room lights via wireless switches or motion sensors. Use digital outputs to trigger relays connected to light fixtures. Add ambient light sensors to prevent the lights from activating in daylight. Total cost: $40–$80 per room depending on sensor count and relay configuration.
Automated Garage Door Opener
Monitor the garage door state (closed/open sensor) and operate a relay to trigger the door opener motor. Carry out safety: require a second confirmation before opening, disable automatic opening if an obstacle is detected, and log every operation. This project demands a relay rated for the motor’s amperage, usually a heavy-duty automotive relay or a solid-state relay rated for 10–20A. Do not attempt to wire this directly to mains power without professional guidance. Cost: $25–$50 plus the cost of a suitable relay module.
Smart Thermostat
Pair a temperature sensor (DHT22 or DS18B20) with logic to trigger heating/cooling relays or modulate a furnace fan. Add a potentiometer (dial) for manual override. Display the current temperature on a 16×2 LCD screen. A basic smart thermostat cuts energy costs and requires no cloud connectivity. Cost: $30–$60.
Water Leak Detector
Install capacitive moisture sensors under sinks, around the water heater, or in the basement. When moisture is detected, trigger an audible alarm and a notification relay (connected to a text-alert module or email integration via an ESP8266 WiFi board). Cost: $15–$35.
Connecting Sensors and Actuators to Your Arduino System
Sensors feed data: actuators execute commands. A motion sensor is an input (reads motion). A relay driving a solenoid lock is an output (activates the lock).
Sensor connections depend on sensor type:
- Digital sensors (on/off, like door contacts) connect to Arduino digital pins and read HIGH/LOW.
- Analog sensors (variable resistance, like temperature or light) connect to analog pins (A0–A5) and return 0–1023 via the ADC.
- Serial sensors (DHT22, DS18B20) use one wire or I2C to communicate multi-byte data.
Actuators almost always use relays (or FETs for low-power DC loads) to isolate the Arduino’s 5V logic from the load. Never drive a relay coil directly from an Arduino pin: current draw will damage the board. Use a relay module with built-in protection diodes.
Wiring checklist: Verify power is disconnected before making connections. Use the multimeter to confirm continuity and test voltage at each junction before powering up. Label every wire. Breadboards are fine for prototyping, but permanent installations should use soldered connections or terminal blocks to prevent vibration-induced disconnects.
Best Practices for Reliable Home Automation
Debouncing and Timing
Sensors are noisy. A motion sensor may fire several times per motion event. Switches bounce, they trigger multiple times on a single press. Code must debounce: read the sensor state, wait 20–50 milliseconds, then read again. Only if both reads match is the event valid. This prevents false triggers and flaky behavior.
Local Processing Over Cloud
Cloud connectivity is convenient, but it introduces latency, privacy concerns, and dependency on internet availability. Run logic locally on the Arduino whenever possible. If remote access is essential, use a secondary ESP8266 or Ethernet shield as a local gateway that communicates with Arduino via serial and bridges to the cloud, this way, core automation survives an outage.
Logging and Diagnostics
Add a serial print statement for every significant event: sensor triggers, relay activations, and timing. These logs identify bugs and help troubleshoot hardware faults. A SD card shield lets the Arduino log to a file for historical analysis.
Testing Under Failure Modes
What happens if a sensor disconnects? If the relay sticks? If power flickers? Code should detect anomalies and fail gracefully: a light that’s supposed to turn off should have a timeout, not rely solely on a sensor to turn it off. A door lock should require explicit user confirmation before opening, not trigger automatically.
Enclosure and Weatherproofing
If any part of the system lives outdoors or in damp spaces, use a weatherproof enclosure rated IP65 or higher. Solder connections instead of breadboard clips to survive vibration and corrosion. Cover the board with a thin layer of lacquer or use conformal coating to protect against moisture.
Documentation
Write comments in the code. Create a wiring diagram, even a hand-drawn one. Note which pins control which devices. This takes 30 minutes upfront but saves hours when troubleshooting months later.
Conclusion
Arduino home automation is fundamentally different from commercial smart home systems: it’s affordable, transparent, and entirely under the builder’s control. A DIYer with basic electronics knowledge and a weekend can automate lighting, monitor environmental conditions, and control appliances for under $200, with zero subscriptions or vendor dependency. The learning curve is real, but the Arduino community and documentation are generous with help. Start small, test thoroughly, and scale incrementally. The smart home of 2026 doesn’t require a major renovation or a corporate platform. It requires a microcontroller, a handful of components, and the willingness to learn.